NIST imaging system maps nanomechanical properties
The National Institute of Standards and Technology (NIST) has developed an imaging system that quickly maps the mechanical properties of materials - how stiff or stretchy they are, for example - at scales on the order of billionths of a meter. The new tool can be a cost-effective way to design and characterize mixed nanoscale materials such as composites or thin-film structures.
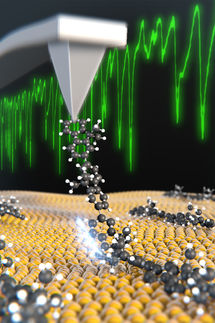
The NIST nanomechanical mapper uses custom software and electronics to process data acquired by a conventional atomic force microscope (AFM), transforming the microscope's normal topographical maps of surfaces into precise two-dimensional representations of mechanical properties near the surface. The images enable scientists to see variations in elasticity, adhesion or friction, which may vary in different materials even after they are mixed together. The NIST system, described fully for the first time in a new paper, can make an image in minutes whereas competing systems might take an entire day.
The images are based on measurements and interpretations of changes in frequency as a vibrating AFM tip scans a surface. Such measurements have commonly been made at stationary positions, but until now 2D imaging at many points across a sample has been too slow to be practical. The NIST DSP-RTS system (for digital signal processor-based resonance tracking system) has the special feature of locking onto and tracking changes in frequency as the tip moves over a surface. Mechanical properties of a sample are deduced from calculations based on measurements of the vibrational frequencies of the AFM tip in the air and changes in frequency when the tip contacts the material surface.
NIST materials researchers have used the system to map elastic properties of thin films with finer spatial resolution than is possible with other tools. The DSP-RTS can produce a 256 × 256 pixel image with micrometer-scale dimensions in 20 to 25 minutes. The new system also is modular and offers greater flexibility than competing approaches. Adding capability to map additional materials properties can be as simple as updating the software.
Original publication: A.B. Kos and D.C. Hurley; "Nanomechanical mapping with resonance tracking scanned probe microscope."; Measurement Science and Technology 2008, 19 015504.
Most read news
Topics
Organizations
Other news from the department science
These products might interest you
Pioneer PX by Ohaus
Never before has a low-cost balance been such a good long-term investment
Accurate results every time - even when exposed to temperature fluctuations & electromagnetic fields
Precision balances by Ohaus
High-performance precision balances for everyday use in laboratories & industry
From milligram-accurate measurement of small samples to routine weighing in the kilogram range
Automatische XPR-Waagen by Mettler-Toledo
Production of standards, samples and concentrations - fast and reliable
Automate the weighing processes in your laboratory - ideal also for sample prep at chromatography
Balances analytiques by Ohaus
Analytical balances with outstanding weighing performance, as easy to use as a smartphone
These space-saving analytical and semi-micro balances are surprisingly intuitive to use

Get the analytics and lab tech industry in your inbox
By submitting this form you agree that LUMITOS AG will send you the newsletter(s) selected above by email. Your data will not be passed on to third parties. Your data will be stored and processed in accordance with our data protection regulations. LUMITOS may contact you by email for the purpose of advertising or market and opinion surveys. You can revoke your consent at any time without giving reasons to LUMITOS AG, Ernst-Augustin-Str. 2, 12489 Berlin, Germany or by e-mail at revoke@lumitos.com with effect for the future. In addition, each email contains a link to unsubscribe from the corresponding newsletter.
